Translate

Jumat, 26 Juli 2013

Driver Genius Professional 12.0.0.1211 Full Version Terbaru 2013

Driver Genius Professional 12.0.0.1211 Full Version Terbaru 2013


Driver Genius Professional 12.0.0.1211 Full Version Terbaru 2013Driver Genius Professional 12.0.0.1211 Full Version Terbaru 2013, Download Terbaru Driver Genius Professional Full Version Terbaru 2013. Driver Genius Professional mengelola PC Anda untuk mendapatkan 100% sampai dengan Driver date dan mengoptimalkan kinerja PC. Driver Genius Profesional adalah manajer dorongan yang kuat untuk Windows yang dapat cadangan, memulihkan, pencarian dan memperbarui driver Anda secara otomatis dalam beberapa klik mouse!

Driver Genius Profesional adalah software yang tersumbat dan mengembalikan driver.

Berikut adalah beberapa fitur kunci dari "Driver Genius Professional":

· Drivers Backup: Driver Genius dapat mendeteksi dan cepat backup driver terinstal di sistem. Hal ini dapat memampatkan driver cadangan untuk file file zip, penggalian diri atau auto executable program installer independen.

· Drivers Restore: Anda tidak perlu menginstal driver satu per satu setelah menginstal ulang Sistem Operasi. Hanya perlu hanya satu klik Anda dapat menginstal semua driver cadangan Anda secara otomatis. Anda juga dapat menginstal driver dalam mode perintah diam-diam. Jika Anda perlu menginstal driver pada beberapa PC dengan konfigurasi hardware yang sama, Driver Genius dapat menghemat banyak waktu Anda untuk menginstal ulang sistem.

· Drivers Update: Apakah Anda masih menggunakan versi lama atau driver versi beta? Mereka driver yang rusak selalu menyebabkan masalah kompatibilitas. Mereka adalah masalah tersembunyi terbesar yang menyebabkan sistem crash. Sebuah driver yang cocok dapat meng-upgrade 50% atau kinerja sistem bahkan lebih. Ada lebih dari 30.000 perangkat driver informasi dalam Database Driver Genius bahwa termasuk Motherboard, kartu suara, kartu video, kartu jaringan, Modem, Mouse, Keyboard, Scanner, Printer, perangkat digital dll Yang perlu Anda lakukan adalah satu klik, Driver Genius akan menemukan semua driver yang perlu update. Semua pengemudi kami tawarkan adalah versi resmi atau versi WHQL, Anda dapat menggunakannya tanpa ada kekhawatiran kompatibilitas.

· Drivers Uninstall: Mungkin ada sisa beberapa driver dalam sistem Anda karena perubahan perangkat keras atau memperbarui driver. Driver Genius dapat mengetahui driver ini berguna cepat dan uninstall mereka.

· LiveUpdate: Kami memperbarui sejumlah besar driver pada website kami. Anda dapat menyinkronkan database dengan server download kami untuk mendapatkan driver versi terbaru oleh program Liveupdate.

Persyaratan:
· Koneksi Internet (untuk update driver)
· Kelas Pentium CPU
· 64 Mb RAM
· 10 Mb ruang hard drive

Cara Instalasi Software
1. Instal Software
2. Setelah Install Jangan Memulai Program
3. Copy & Ganti Crack Ke (C: \ Program Files \ Driver-Lembut \ DriverGenius)
4. Selesai!

Driver Genius Professional 12.0.0.1211 Full Version Terbaru 2013
Password : windows8kita

Kamis, 25 Juli 2013

Cara Instal Point Blank Di Komputer

Cara Instal Point Blank Di Komputer

Point Blank Indonesia game online dari gemscool untuk saat ini permainan game online yang paling banyak digemari gamers Indonesia. Pemain point blank Indonesia diperkirakan sudah mencapai jutaan jumlahnya. Point yang ada di Indonesia sebenarnya adalah game yang sudah di edit.
PointBlank, merupakan game FPS yang saat ini paling ramai di Indonesia. Tapi, masih saja ada yang bingung meng-install game ini di Windows 7. Bagaimana cara meng-install PointBlank di Windows 7?
  1. Siapkan file setup yang disediakan oleh Gemscool, jika belum punya, silakan download dari Gemscool atau GameQQ atau Laciku,
  2. Setelah itu download juga file patch update terbaru yang disediakan disini,
  3. Klik kanan PBSetup.exe dan pilih Run as Administrator, jika muncul konfirmasi pilih Yes, install hingga selesai,
  4. Install juga file patch terbaru,
  5. Jika sudah selesai, klik kanan shortcut PointBlank pada desktop, pilih Properties, klik tabCompatibility, checklist Run this program as an administrator, klik OK,
  6. Terapkan juga shortcut yang ada di start menu (Start > All Programs > PointBlank Online > PointBlank)
  7. PointBlank siap dimainkan!

Rabu, 24 Juli 2013

Mencoba Memperbaiki Kompi Atau Lapi Sendiri Dengan Mengetahui Penyebabnya.

Mencoba Memperbaiki Kompi Atau Lapi Sendiri Dengan Mengetahui Penyebabnya.


tentunya menjadi skill yang dibutuhkan untuk seorang yang pc mania, beraktifitas dengan pc entah untuk hobi(gamer), buat kerjaan, maupun buat browsing. Namun yang banyak terjadi orang-orang kesannya hanya tahu pakai dan begitu mengalami kerusakan jadi kelimpungan sendiri. Dimana jika PC sering kali menunjukan adanya peng-alamatan yang rumit, atau menampilkan suatu pesan error, mengeluarkan bunyi beep yang terus menerus secara beraturan atau tidak beraturan, PC tersebut kemungkinan besar sedang dalam masalah, saya akan memberikan Tips dan solusi untuk mengatasi masalah tersebut dan PC Anda dapat berfungsi kembali seperti sedia kala.
Masalah atau kerusakan yang timbul biasanya dikategorikan dalam 2 jenis kerusakan yaitu : Masalah atau kerusakan Hardware dan Software
Jenis Kerusakan Dapat dikategorikan menjadi 2 kategori, yaitu :
1. Kerusakan Pada Hardware (Perangkat Keras)
2. Kerusakan Pada Software (Perangkat Lunak)

Kerusakan pada Hardware :
Masalah dengan komponen Hardware perlu penanganan yang serius karena sulit dilokalisir dan disingkirkan tanpa tools yang tepat, keahlian dan pengalaman yang menunjang. Penjelasan akan berkisar pada masalah yang sering terjadi disertai dengan cara mengatasinya.
1. Kerusakan Pada Power Supply
Gejala :
Setelah dihidupkan PC tidak bereaksi apa-apa, tidak ada tampilan di monitor, tidak ada lampu indikator (led) yang menyala, kipas power supply tidak berputar, lampu indikator pada monitor tidak menyala.
Solusi :
Periksalah apakah kabel terhubung dengan benar dan steker terpasang dengan baik pada soketnya, periksa juga apakah ada tombol on/off dibelakang tepatnya dibelakang Power Supply sudah dalam posisi On, Jika sudah yakin terpasang dengan benar tapi tetap tidak ada respon untuk meyakinkan silahkan anda ganti kabel power dengan yang anda yakini bagus. Masalah terjadi karena tidak adanya tegangan listrik yang masuk, kerusakan ada pada kabel power.
Masalah :
Setelah dihidupkan PC tidak bereaksi apa-apa, tidak ada tampilan di monitor, tidak ada lampu indikator (led) yang menyala, kipas power supply tidak berputar, lampu indikator pada monitor menyala.
Solusi :
Lakukan seperti langkah diatas, tetapi jika masih belum ada respon berati masalah ada pada Power Supply, Silahkan anda ganti PS nya, Saya sarankan sebaiknya anda ganti saja Power Supply yang rusak dengan yang baru, dan hati-hatilah dalam pemasangannya.
Catatan : Jika kerusakan hanya pada Power Supply saja, Setelah anda menggantinya, komputer akan kembali bekerja dengan normal. Kecuali jika ada masalah pada komponen yang lainnya seperti Mother Board, VGA Card dan Memory.
2. Kerusakan Pada Mother Board
Gejala :
Setelah dihidupkan, tidak ada tampilan di monitor, lampu indikator (led) di panel depan menyala, lampu indikator (led) monitor berkedip-kedip, kipas power supply dan kipas procesor berputar, tidak ada suara beep di speaker.
Solusi :
Langkah pertama lepas semua kabel power yang terhubung ke listrik, kabel data ke monitor, kabel keyboad/mouse, dan semua kabel yang terhubung ke CPU, kemudian lepas semua sekrup penutup cashing. Dalam keadaan casing terbuka silahkan anda lepaskan juga komponen-komponen lainnya, yaitu kabel tegangan dari power supply yang terhubung ke Motherboard, harddisk, floppy, hati-hati dalam pengerjaannya jangan terburu-buru. Begitu juga dengan Card yang menempel pada Mboard (VGA, Sound atau Card lainnya). Sekarang yang menempel pada cashing hanya MotherBoard saja. Silahkan anda periksa Motherboadnya dengan teliti, lihat Chip (IC), Elko, Transistor dan yang lainnya apakah ada yang terbakar.
Jika tidak ada tanda-tanda komponen yang terbakar kemungkinan Motherboard masih bagus, tapi ada kalanya Mother board tidak jalan karena kerusakan pada program yang terdapat di BIOS
Gejala :
Pada saat CPU dinyalakan kemudian melakukan proses Post setelah itu proses tidak berlanjut dan diam beberapa saat tidak langsung masuk ke operating system, dan kemudian di layar monitor ada pesan “harddisk error, harddisk Failur, setelah itu muncul pesan “press F1 to continou” setelah kita menekan tombol F1 tidak masuk Operating system dan muncul pesan “Operating system not found”.
3. Kerusakan Pada Harddisk
Solusi :
Periksa kabel tegangan dan kabel data yang masuk ke harddisk apakah longgar, sebaiknya dikencangkan, kemudian nyalakan dan coba anda dengarkan apakah suara yang keluar dari harddisk normal, jika tidak normal berati harddisk rusak di controllernya.
Gejala :
Pada saat CPU dinyalakan kemudian melakukan proses Post setelah itu muncul pesan “Operating system not found”.
Solusi :
Ada kemungkinan Operating system rusak, bisa diatasi dengan install ualng atau jika OS anda menggunakan windows 2000/XP ada Fasilitas Repairnya. atau ada kemungkinan juga harddisk anda tidak terdeteksi dan lakukan langkah diatas
Gejala :
harddisk bad sector?
Solusi :
Ada beberapa faktor penyebab terjadi bad sector diantaranya, tegangan listrik tidak stabil, sering terjadi putusnya aliran listrik secara mendadak, setelah pemakaina tidak di shot down, pemakaian yang terlalu lama, ada 2 jenis bad sector yaitu fisik dan software…..Untuk mengatasinya ada beberapa cara, diantaranya menggunakan software untuk menghilangkan badsector….pembahan lebih lanjut ada di eBook Metode perbaikan komputer dan bisa anda dapatkan jika anda bergabung menjadi Member Aktif.
4. Kerusakan CD/DVD/ROM/RW & Floppy Disk
Gejala :
Jenis kerusakan yang biasa ditemui :
1. Tidak terdeteksi di windows
2. Tidak bisa keluar masuk CD
3. Tidak bisa membaca/menulis/hanya bisa membaca saja. (CD)
4. Tidak bisa membaca/menulis/write protect (Floppy disk)
Solusi :
1. Periksa kabel data dan kabel tegangan yang masuk ke CD-floppy, perikas di setup bios apakah sudah dideteksi? sebaiknya diset auto. Periksa apakah led menyala, jika tidak kerusakan di Controllernya.
2. Kerusakan ada pada mekanik motor atau karet motor.
3. Kerusakan Biasanya pada optik, tetapi ada kemungkinan masih bisa diperbaiki dengan cara men-set ualng optik tersebut.
4. Head Kotor, bisa dibersihkan menggunakan Cutenbud (langkah-langkah diatas secara lengkap dapat anda temukan di e-book “Metode perbaikan komputer cepat dan akurat” dan bisa anda dapatkan jika anda bergabung menjadi member perbaikankomputer.com
Masalah BIOS
Gejala :
Hati-hati dalam Update Bios, ketika meng-Update anda keliru memilih versi Bios, PC jadi tidak jalan bahkan anda tidak dapat masuk ke BIOS.
Solusi :
Biasanya Update tidak dapat dibatalkan, hanya jenis Motherboard tertentu yang memiliki backup BIOS pada Chip-nya, Disitu tersimpan jenis asli BIOS yang tidak dapat dihapus, untuk dapat merestore-nya anda tinggal memindahkan Posisi Jumper khusus yang biasanya sudah ada petunjuk di buku manualnya. Kemudian hidupka PC dan tunggu 10 detik, BIOS yang asli telah di Restore, kembalikan Posisi Jumper pada posisi semula, dan PC siap dijalankan kembali. Jika Motherboard tidak memiliki pasilitas tersebut, Chip BIOS harus dikirim ke Produsen, Jenis BIOS dapat anda lihat di buku manualnya. Berhati-hati dalam pemasangannya jangan sampai kaki IC BIOS patah atau terbalik Posisinya.
Gejala :
CPU mengeluarkan suara Beep beberapa kali di speakernya dan tidak ada tampilan ke layar monitor, padahal monitor tidak bermasalah.
Solusi :
Bunyi Beep menandakan adanya pesan kesalahan tertentu dari BIOS, Bunyi tersebut menunjukan jenis kesalahan apa yang terjadi pada PC, Biasanya kesalahan pada Memory yang tdk terdeteksi, VGA Card, yang tidak terpasang dengan baik, Processor bahkan kabel data Monitor pun bisa jadi penyebabnya.Silahkan anda periksa masalah tersebut.
Berikut Pesan kesalahan BIOS :
Bunyi kesalahan BIOS biasanya tidak semua. Motherboard menandakan kesalahan yang sama tergantung dari jenis BIOS nya.
[AMI BIOS]
Beep 1x : RAM/Memory tidak terpasang dengan Baik atau Rusak, Beep 6x : Kesalahan Gate A20 – Menunjukan Keyboard yang rusak atau IC Gate A20-nya sendiri, Beep 8x : Grapihic Card / VGA Card tidak terpasang dengan baik atau Rusak, Beep 11x : Checksum Error, periksa Batre Bios, dan ganti dengan yang baru.
[AWARD BIOS]
Beep 1x Panjang : RAM/Memory tidak terpasang dengan Baik atau Rusak, Beep 1x Panjang 2x Pendek : Kerusakan Pada Graphic Card (VGA), Periksa bisa juga Pemasangan pada slotnya tidak pas (kurang masuk), Beep 1x Panjang 3x Pendek : Keyboard rusak atau tidak terpasang. Beep Tidak terputus / bunyi terus menerus : RAM atau Graphic Card tidak terdeteksi.
Batrey CMOS Rusak / Lemah
Gejala : Muncul Pesan CMOS Checksum Vailure / Batrey Low, diakibatkan tegangna yang men-supply IC CMOS/BIOS tidak normal dikarenakan batrey lemah, sehingga settingan BIOS kembali ke Default-nya/setingan standar pabrik, dan konfigurasi Hardware harus di Set ulang.
Solusi : Segera Ganti Batrey nya
Gejala : CPU yang sering Hang?
Solusi : Ada beberapa faktor terjadi hanging diantaranya : Ada BadSector di Harddisk, Ada Virus, Ada masalah di Hardware seperti Memory Kotor/Rusak, MBoard Kotor/Rusak, Cooling Fan perputaran fan nya sudah lemah, Power Supply tidak stabil…..sebaiknya jangan dipaksakan untuk digunakan karena akan berakibat lebih fatal, silahkan hub: kami untuk dapat mengatasi masalah tersebut
Gejala : Komputer sering tampil blue screen apa penyebabnya?
Solusi : Pesan Blue Screen bisa disebabkan system windows ada yang rusak, Bisa dari Memory, Bisa dari hardisk, bisa dari komponen lainnya, tergantung pesan blue screen yang ditampilkan.
Gejala : Komputer jadi lebih lambat dari sebelumnya, padahal awalnya tidak begitu lambat
Solusi : Penyebab komputer anda prosesnya lambat ada beberapa faktor yaitu : Space hardisk terlalu penuh, terlalu banyak program / software yang memakan space harddisk dan memory, ada virus, harddisk badsector.
(berbagai sumber)

Belajar CMD


Belajar CMD

Command prompt atau yang biasa orang sebut CMD. terkadang kita sangat memerlukan, apabila suatu saat windows kita tidak bisa jalan, dan semua file berada di direktori C (pusing kan..),kalau mau kita instal ulang maka semua data atau document akan hilang, di saat seperti inilah kita masih membutuhkan, kita bisa copy paste semua file lewat dos.
Dan rasanya kurang lengkap kalau seorang administrator tidak bisa dos,hal ini tidak aneh karena untuk belajar dos kita harus mandiri, karena tidak setiap kampus ada matakuliah tentang dos.
oke!. kita mulai saja, mari belajar bersama-sama…….
Pertama-tama kita buka dulu dosnya, bisa lewat
start/run/cmd/ok
atau start/programs/accessoris/comand pomrt/
Berpindah kedrive lain
Dengan perintah ini kamu bisa berpindah dari satu drive kedrive lain
Ketikkan nama drive kemudian titik dua contohnya dari C kita mau kedrive D, ketikkan aja D: lalu enter , untuk lebih jelasnya lihat gambar nih…
Menampilkan isi drive/direktori
Gunain perintah DIR, caranya pada drive atau direktori aktif ketikkan DIR lalu enter.

bila sudah terbuka tentukan drive mana yang akan kita lihat atau kita copy…
contoh kita mau lihat drive d.
ketikan lalu tekan enter makan akan muncul d:/> setelah itu ketikan dir lalu enter..
Berpindah ke direktori lainnya
Gunain aja perintah CD atau panjangnya Call Directory
Memanggil Sub Direktori
Ketikkan perintah CD spasi nama direktori yang akan dibuka lalu enter, contoh cd [spasi] Aap
Berpindah ke direktori sebelumnya
Gunain CD.. (CD titik dua) untuk kembali satu level kedirektori sebelumnya
Gunain CD\ untuk kembali ke direktori root
Memanggil directory lain secara langsung
Prinsipnya sama aja kayak tadi gunain perintah CD spasi path direktori yang akan dipanggil, untuk lebih jelasnya lihat contohnya aja ya… misal saya berada pada drive D dan ingin memanggil subdirektori nix yang terletak dua level didalamnya, saya hanya perlu ketikkan perintah CD [spasi] aap/nix
Perintah ini juga bisa digunain untuk mengakses direktori-direktori lain yang satu drive walaupun berbeda direktori utama, missal saya akan panda dari dalam direktori aap\nix menuju data\tutorku, maka cukup saya ketikkan cd d:\data\tutorku
Membuat direktori baru
Gunaik perintah MD, caranya ketik MD [spasi] nama direktori yang akan dibuat, misalkan saya akan buat direktori dengan nama abc, maka cukup ketikkan MD [spasi] abc , untuk melihat direktori kita udah ada belum, gunain perintah DIR lalu enter, gimana udah ada kan….
Menampilkan direktori beserta sub-subnya
Caranya gunain perintah tree. Langsung aja ketikan perintah tree n enter
Menghapus direktori
Gunain perintah rd [spasi] nama direktori, cara ini digunain untuk menghapus direktori yang kosong atau tidak berisi…
Gunain perintah rd [spasi] /s [spasi] nama direktori , untuk menghapus direktori yang ada isinya, jika muncul konfirmasi, ketikkan Y atau N untuk cancel atau membatalkan
Membersihkan layar
Caranya cukup mudah ketikkan aja perintah CLS lalu enter, bersih dech semua kotoran.. kalo bersiin layar monitor pake tisu atau kain halus ya… kalo pake CLS kagak bersih-bersih layar monitor kamu…
Mencari file tertentu
Gunain aja perintah dir, tapi kita modifikasi sedikit, misalnya kita akan mencari file berekstensi *.zip , cukup ketikkan perintah dir [spasi] *.zip , lalu enter
Mengcopy file
Bukannya mau ngopi ya.. kalo mau ngopi, beli ABC susu skalian buatin untuk saya , ni perintah untuk mengcopy file… ketikkan perintah copy [spasi] nama file yang dicopy [spasi] path tujuan, misalkan kita ingin mengopy file yang terletak didrive D, kedrive C, maka pada drive D ketik perintah copy [spasi] file yang akan dicopy [spasi] drive tujuan
Selain itu kamu juga bisa mengcopy file sekaligus mengganti namanya langsung
Ex : copy [spasi] photoshop.doc [spasi] c:\tipsphotoshop.doc
Atau mengopy dalam satu folder, cukup ketikkan, langsung contohnya aja ya…
Copy [spasi] photoshop.doc [spasi] tipsphotoshop.doc
Mengganti nama file
Gunain perintah RENAME atau REN. Ketikkan ren [spasi] nama file asal [spasi] nama file baru
Menghapus file
Gunain perintah DEL, ketikkan perintah del [spasi] nama file
Menampilkan isi file
Kamu bisa nampilin file dengan ekstensi *.bat, *.bak, *.ini, *.txt dll.
Caranya gunain perintah TYPE [spasi] nama file.
Semoga Bermanfaat…

Selasa, 23 Juli 2013

Ramnit (Shortcut)

Trik Cara Mudah Menghilangkan Virus Ramnit (Shortcut)

Posted By Dedik Sugiharto at Senin, 29 April 2013 | 29.4.13

Virus,Ranmit,shortcut
Cara Menghapus dan Menghilangkan Virus Shortcut dengan CMD. Virus Ramnit atau yang lebih dikenal dengan virus Shortcut merupakan salah satu jenis virus yang cukup menjengkelkan keberadaaannya. Lebih dikenal sebagai virus shortcut karena file-file yang telah diinfeksinya berubah menjadi layaknya icon shortcut dan ukuran filenya semua berubah menjadi 1 kb. Cara kerja virus ini ialah dengan menyembunyikan atau hidden file asli dan menggantinya dengan wajah shortcut,
Ramnit,shortcut,virus,folder
Coba lihat properties Flashdisk atau HardDrive anda, ukurannya akan sama karena virus ini tidak menghapus hanya saja menyembunyikan. Biasanya masalah virus ini sering ditemui pada media penyimpanan Flashdisk yang disebabkan karena sebelumnya telah dicolokkan Komputer atau laptop yang terinfeksi virus. Lalu Bagaimana Cara Mengatasinya? Simak tips gaptek berikut.

Mengatasi Virus Shortcut Dengan CMD.
  1. Buka Aplikasi Command Prompt. Bisa juga melalui Run (win + r) lalu ketikkan "cmd" lalu enter .
  2. Setelah CMD terbuka, tentukan letak berada di manakah drive Flasdisk atau Hardisk anda yang terdapat file virus shortcut . C:, D:, E:, F: atau apa?. Misalkan saja di F. Ketikkan di CMD tadi "F:". Setelah itu ketikkan "dir", maka akan terlihat semua file anda.
  3. Mengetik kembali, kini masukkan "attrib –s –h –r /s /d" . Lalu Enter. Tunggu sejenak Sampai muncul F:/>.
  4. Setelah itu silakan coba hapus seluruh file shortcutnya. Selesai.
Sekedar Tips : Untuk Menjaga keamanan PC anda dari serangan virus apapun, Gunakan Antivirus yang handal dan Up to Date. Luar dan Lokal. Rutin scanning. Scan USB yamg masuk.

info tambahan :
http://inet.detik.com/read/2013/05/17/164607/2249128/323/ini-cara-sembuhkan-pc-sakit-karena-ramnit 

Cara merubah windows bajakan menjadi Genuine

Cara merubah windows bajakan menjadi Genuine

langsung aja ceqidot ya kakak
cara merubah windows xp menjadi genuine
Quote:Trik ini sebetulnya ane juga dapet dari salah satu blog favorit ane yang menyediakan segudang software dengan cracknya. Heheheee… begini nih. Ini trik udah pernah ane coba untuk ngerubah windows xp service pack 2 yang ane pake waktu itu. Weh…ternyata it works…100%, dijamin. Kalo untuk os lainnya ga tau ya. yang mo ane share ya berdasarkan pengalaman ane aja
Caranya praktis gan. Ga perlu pake crack atau software atau tool apalah buat ngejadiin xp bajakan jadi ori. Pertama cek dulu ya gan windows xp agan genuine atw ga. Caranya? Gampang, download Disini nih toolnya buat ngecek yu punya os ori apa bajakan. Cara gunain toolnya cuma tinggal klik continue. Itu tool namanya MGAdiag ya. Jangan lupa download juga WGA Pluginnya gan, download Disini nih.
Langkah selanjutnya nonaktifin dulu windowsnya. Kan kita mo aktivasi windows secara online. Caranya masuk ke registry, klik logo windows plus R atau buka kotak run trus ketik regedit, klik ok.

Lanjut Klik HK_LOCAL_MACHINE>SOFTWARE>MICROSOFT>WINDOWS NT>WPAevent, ubah value Oobet Timernya dua huruf atau dua angka terserah, bebas diganti dengan huruf apa aja atau angka berapa aja, caranya klik kanan pada oobet timer pilih modify.
seperti ini SSnya

Quote:Kalo udah tutup dulu jendela registry nya trus buka kotak run ketik %systemroot%\system32\oobe\msoobe.exe /a, klik oke. Jendela aktivasi windows akan muncul seperti gambar dibawah. Ingat pada saat aktivasi koneksi internet harus on ya.

Trus pilih “Yes I want to telephone a customer service representative to activate windows”, klik next. Dan akan muncul jendela seperti dibawah.


Isiannya ga usah diisi gan langsung klik “Change Product Key” trus isi dengan serial number xp yang ori nya gan. Nih serial number xp yang bisa dicoba gan.Waktu itu gw pake yang kedua, sekali masukin langsung jadi genuine. Dicoba aja gan serialnya.
Spoiler Hide
1. V2C47 – MK7JD – 3R89F – D2KXW – VPK3J
2. H689T – BFM2F – R6GF8 – 9WPYM – B6378
3. WCBG6 – 48773 – B4BYX – 73KJP – KM3K3
Serial lainnya :
BKQW7 – 3JYTB – D26TX – DHPDM – 3MTKG
XP PRO SP 2 : QW4HD – DQCRG – HM64M – 6GJRK-8K83T
XP 64-Bit : M4676 – 2VW7F – 6BCVH – 9QPBF – QBRBMXP
Black edition : W9VCJ-74DXW-JDDBV-PW777-WXD2T
Quote:Kalo udah klik “Update”, trus muncul jendela lagi klik aja “Remind Me Later”. Sampe disini dah selesai gan. Langsung cek pake MGAdiag tadi windows dah jadi ori belum. Kalo udah tampilannya seperti dibawah nih.

Hasilnya Validation : Genuine ( warna hijau ) gan. Kalo belum berhasil alias hasil validationnya VLK Blocked silakan diulangi aktivasi online dengan menggunakan serial number yang lainnya. Kalo hasilnya “Validation not installed” silakan klik “Resolve” dibawah jendela MGAdiag, nanti dengan sendirinya jendela browser Internet Explorer akan terbuka, proses validasi berjalan dan nanti kita diminta untuk menginstall ActiveX Control, nanti akan muncul notification bar, ok trus untuk nginstall ActiveX Controlnya klik bar yang berwarna kuning dibawah tool bar browser.
Kalo udah diinstall proses validasi akan dilanjutkan. Kalo udah selesai dijamin windows dah jadi genuine. Tutup browser dan restart komputer. Cek lagi pake MGAdiag toolnya. Eng ing eng…..hasilnya pasti “Genuine”. Heheheee…..
Oke deh selamat mencoba. Semoga berhasil ya kakak

Senin, 22 Juli 2013

Cara Uninstall Software Yang Sulit di Uninstall

Cara Uninstall Software Yang Sulit di Uninstall


Cara Uninstall Software Yang Sulit di Uninstall
Pada Posting sebelumnya saya share 'KMPlayer Plus v3.4.0.59', sekarang saya lanjutkan dengan share 'Cara Uninstall Software Yang Sulit di Uninstall'.
Sebagian besar software atau aplikasi menyertakan option untuk uninstall aplikasi tersebut di kemudian hari melalui shortcut yang di buat oleh installer software tersebut maupun melalui add remove program/program and features di control panel, namun pada kasus yang berbeda option untuk uninstall software tersebut tidak dapat kita temukan di shortcut maupun control panel dan tentu saja hal ini menimbulkan masalah bagi kita.. right? Baiklah berikut ini langkah-langkah untuk uninstall software yang membandel tersebut.

Screenshot & Langkah-langkah:
I. Apabila Software Terlihat di dalam Daftar All Programs:
  1. Download aplikasi Revo Uninstaller Pro di revo uninstaller
  2. Jalankan Aplikasi Revo Uninstaller Pro kemudian klik software yang ingin Anda uninstall yang terlihat di dalam daftar all programs, sebagai contoh di sini yaitu aplikasi Kamus English - Indonesia, lalu klik 'Uninstall', atau dapat juga dilakukan dengan cara klik kanan icon software tersebut kemudian klik 'Uninstall' Lalu ikuti prosesnya seperti pada gambar di bawah ini.
  3. Cara Uninstall Software Yang Sulit di Uninstall
    Cara Uninstall Software Yang Sulit di Uninstall
    Cara Uninstall Software Yang Sulit di Uninstall
    Cara Uninstall Software Yang Sulit di Uninstall
    Cara Uninstall Software Yang Sulit di Uninstall
    Cara Uninstall Software Yang Sulit di Uninstall
    Cara Uninstall Software Yang Sulit di Uninstall
    Cara Uninstall Software Yang Sulit di Uninstall
    Cara Uninstall Software Yang Sulit di Uninstall
    Cara Uninstall Software Yang Sulit di Uninstall
    Cara Uninstall Software Yang Sulit di Uninstall
  4. Selesai..!! Pastikan Anda telah menghapus semua 'Found Leftover Files and Folders'.
II. Apabila Software Tidak Terlihat di dalam Daftar All Programs:
  1. Download aplikasi Revo Uninstaller Pro di sini.
  2. Jalankan Aplikasi Revo Uninstaller Pro kemudian klik 'Forced Uninstall', lalu 'Browse' file executable software yang ingin Anda Uninstall sebagai contoh di sini yaitu aplikasi Kamus English - Indonesia yang terletak di 'C:\Program Files\Kamus2\' lalu klik 'Open'. Kemudian ikuti prosesnya seperti pada gambar di bawah ini.
  3. Cara Uninstall Software Yang Sulit di Uninstall
    Cara Uninstall Software Yang Sulit di Uninstall
    Cara Uninstall Software Yang Sulit di Uninstall
    Cara Uninstall Software Yang Sulit di Uninstall
    Cara Uninstall Software Yang Sulit di Uninstall
    Cara Uninstall Software Yang Sulit di Uninstall
    Cara Uninstall Software Yang Sulit di Uninstall
    Cara Uninstall Software Yang Sulit di Uninstall
  4. Selesai..!! Pastikan Anda telah menghapus semua 'Found Leftover Files and Folders'.

Nb. Proses uninstall sofware yang berbeda sangat memungkinkan Anda akan menemukan kasus yang berbeda pula khususnya pada 'Found leftover files and folders'. Pastikan Anda hapus semua 'Found leftover files and folders' yang terdeteksi pada proses 'Scan'.

Minggu, 21 Juli 2013

3 Tips to Make Your Windows XP Genuine

3 Tips to Make Your Windows XP Genuine

by Bilal Ahmad (sumber : http://www.techmaish.com/2-tips-to-make-your-windows-xp-genuine/ )
Share & Comment
Share on reddit

If your Window XP is not genuine and you want to make it genuine then there is a simple tip for you. This is free and  no need to pay a single penny for making your Window XP genuine. Use the features of a full version and enjoy a genuine windows for free.
follow the below steps to make windows XP genuine.

How to Make Windows XP Genuine

1:- Open NotePad from Start Menu and paste the following code in your notepad program.
Windows Registry Editor Version 5.00
[HKEY_LOCAL_MACHINESOFTWAREMicrosoftWindows NTCurrentVersion]
“CurrentBuild”=”1.511.1 () (Obsolete data – do not use)”
“ProductId”=”55274-640-1011873-23081″
“DigitalProductId”=hex:a4,00,00,00,03,00,00,00,35,35,32,37,34,2d,36,34,30,2d,
31,30,31,31,38,37,33,2d,32,33,30,38,31,00,2e,00,00,00,41,32,32,2d,30,30,30,
30,31,00,00,00,00,00,00,00,86,56,4e,4c,21,1b,2b,6a,a3,78,8e,8f,98,5c,00,00,
00,00,00,00,dd,da,47,41,cc,6b,06,00,00,00,00,00,00,00,00,00,00,00,00,00,00,
00,00,00,00,00,00,00,00,00,00,00,38,31,30,32,36,00,00,00,00,00,00,00,b5,16,
00,00,83,83,1f,38,f8,01,00,00,f5,1c,00,00,00,00,00,00,00,00,00,00,00,00,00,
00,00,00,00,00,00,00,00,00,00,00,00,00,00,00,00,00,66,e5,70,f3
“LicenseInfo”=hex:33,b7,21,c1,e5,e7,cd,4b,fd,7c,c6,35,51,fd,52,57,17,86,3e,18,
d3,f4,8c,8e,35,32,7b,d1,43,8d,61,38,60,a4,ca,55,c9,9a,35,17,46,7a,4f,91,fc,
4a,d9,db,64,5c,c4,e2,0f,34,f3,ea
[HKEY_LOCAL_MACHINESOFTWAREMicrosoftWindows NTCurrentVersionWPAEvents]
“OOBETimer”=hex:ff,d5,71,d6,8b,6a,8d,6f,d5,33,93,fd
2. Now save the file on the name of Genuine.reg (Make sure to save it with .reg extension.). Save the file on Desktop
3:- Close the file and go to Desktop and double click on the file you just saved. Run the file.
4:- Your Windows XP is now genuine. Restart your windows and that’s it.

Second Method

If you are not lucky and the above method is not working for you then don’t worry you can try this one.
1. Download this file
2. Extract it and Run the file.
3. Now go to genuine microsoft software and click on the button “Validate Windows”
4. Done

3rd Method

Even if the above two methods are also not working for you, then try this one.
1. Click on “Start>Run” and enter regedit.
2. Navigate to the following location.
LOCAL-MACHINE-SOFTWARE-Microsoft-Window’s NT-Current Version-WPAEvents
3. Now click on “OOBE Timer” located at right side of the box. Delete all the values and close Regedit.
4. Now click on “Start>Run” and type the following and hit enter.
%systemroot%\system32\oobe\msoobe.exe /a
5. One the next page select “Use Phone to Activate” and click on “Change Product Key”. A box will be shown where you need to enter the following Product Key.
77D6F-94376-8hGKG-VRDRQ
OR
JG28K-H9Q7X-BH6W4-3PDCQ-6XBFJ
6. Click on “Update” and then “Remember Later” option. Once you are done, Restart your PC.
7. Now the final step is to enter the below code again in “Start>Run” to make sure that your windows is genuine.
%systemroot%\system32\oobe\msoobe.exe /a

Windows XP 15 Minute Tune-Up - Fix Sluggish Performance for Free

Windows XP 15 Minute Tune-Up - Fix Sluggish Performance for Free 


Last Modified: February 19, 2006
Written By:
Dan "Tweak Monkey" Kennedy
Before e-mailing, please consult the forums for additional support.
Don't throw out that old PC yet!
A fine-tuned Windows XP PC can run quite fast even it's seriously lacking in the memory and CPU department. Before you chuck out your PC to buy a new one, try stripping some of the rust that's built-up over the years; the results may surprise you.
It's probably your operating system that's slow, not the PC. It's software, not hardware - you know, invisible 1s and 0s held in an electric field representing your data. Your computer is still fast, but there's a ton of stuff slowing it down. There's more 1s where there should be 0s and your PC is killing itself fighting an impossible battle to burn off this fat.
We've seen Pentium II machines with 128 MB RAM run XP faster than Pentium IVs with 4x the clock speed and 4x the RAM - so what gives? This article will help you figure out why your PC is running slow and outline exact steps to fix it quickly, before throwing in the towel with a format, restore, or new PC purchase.


The Culprit - What Slows Down Your PC
Before you dive into your PC, it is absolutely critical that you determine what is slowing it down. Ignoring a bad hard drive could lead to catastrophic damage with data loss. Lack of sufficient RAM completely limits a PC's performance. Spyware and malware could be having a circus inside your OS - just like in 90%+ of other PCs online. There are other causes for PCs to run slow, but these are the most common.
The basic symptoms of a bad hard drive are: extremely slow performance, blue screen of death error screens, system errors on startup, and strange sounds coming from your PC, especially clicking sounds. If you suspect your drive is failing, shut down your PC as soon as possible. Download Hitachi's DFT, burn a CD to test your drive, boot off it, and run a scan to determine if it's defective. If you use a bad hard drive for too long you might suffer complete data loss.
It's possible your PC doesn't have enough RAM. The amount of RAM your PC has can be checked by hitting the Windows and Pause/Break keys at the same time. The amount is listed toward the bottom right. The same information can be accessed by right-clicking My Computer and choosing Properties.
We've seen Windows XP run with 64 MB RAM and it is not pretty. With 128 MB, an XP machine can survive basic tasks as long as there is not a lot loaded into memory. We consider 256 MB to be the absolute tolerable minimum. The jump to 512 MB will help speed up the PC considerably, especially if there is antivirus or anti-spyware software running in the background. Currently 1024 MB (or 1 gigabyte) seems to be the sweet spot, where adding more RAM doesn't seem to be cost effective for most users. However, gamers can usually benefit from the jump to 2 GB. RAM is cheap. Check your local retail ads for sales. Seriously consider upgrading if your PC has less than 512 MB. Instructions on installing RAM can be found here. Instructions are available for notebooks here.
You might avoid spyware like a flagged minefield. But if kids, friends, or PC newbies are using your PC to browse the Internet it's very likely that your PC is infected. The basic symptoms of spyware, malware, adware are: slow performance, pop-up ads, strange error messages, extra toolbars in your browser, frequent web browser crashes, and slow or completely non-functional Internet. Completely removing spyware can be a big job. If you're not up for it, you may want to pay a repair shop to complete the job for you. To remove spyware, here's our most recent guide. Our older guide is available here.
If all of these other things are not the problem, your PC is probably just cluttered with crap and needs a tune-up. This article covers a quick (5-15 minute) tune-up for Windows XP. The basic approach: Visual effects, Add/Remove Programs, Startup folder, temp files, registry cleaning, CCleaner, services, then defragment.
Shown below is the before and after CPU usage from a typical tune-up of this type. The PC tested here started with 42 processes using over 152 MB of memory. After the tune-up, this was dropped to 23 processes using only 63 MB of memory.
Before:After:
To see your current CPU and memory usage, hit CTRL-ALT-DELETE and view the Performance tab. The number of processes is listed in the bottom-left corner.


Step 1: Stripping off the Rust
The visual effects, that is animations, shadows, and extra Windows XP polished interface, eat up CPU and memory (especially on older PCs). Hit the Windows and Pause/Break keys or right-click My Computer and choose Properties. Navigate to the Advanced tab, then click the first Settings box. Very slow (<500 MHz) PCs should definitely have this set for Best Performance. Most PC users won't notice or care if the following are the only options left enabled:
  • Animate Windows when minimizing and maximizing
  • Smooth edges of screen fonts
  • Smooth-scroll list boxes
  • Use drop shadows for icon labels on the desktop
If you plan to use Common tasks (such as the built-in Windows Explorer CD Burning Utility, you may want to leave Use common tasks in folders enabled. Read through this list and determine what else you may want. Test the settings using the Apply button before deciding you're OK with changes. Turn off your background image and you'll notice the desktop comes up slightly faster. It also (depending on the detail of the image) will give you more free memory. This can be accessed by right clicking the Desktop, choosing Properties, Desktop, and looking under Background.

Sure, it looks plain. But it helps a bit with resources.
To further tweak the visual settings for maximum performance download Tweak UI.


Step 2: Remove Extra Programs
In general, the more programs you have installed, the more memory they are using. This isn't the case with all programs, but it's still good practice to remove programs you don't use. You'll save hard drive space and even system memory if the programs load at Windows startup.
Add/Remove Programs
Enter the Control Panel (Start, Control Panel or Settings/Control Panel) and go to the Add/Remove Programs applet. The list of programs you'll see rarely contains anything essential to the PC's operation. Most of the programs were installed by a user and can be removed if they are not required - just don't remove Microsoft Office and so-on if you plan to use it.
Go through this list and remove all the programs you're positive you don't use or need. Anything you're unsure of should be researched on Google before you uninstall it. The most common entries we uninstall are: AOL, AOL AntiSpyware, Yahoo Toolbar, Wintools, Viewpoint Media Player, Speedway, Weatherbug and various "Deals", which are almost always spyware. Additionally we'll remove programs installed for one-time use or that we thought we'd use but never did. If you don't use AOL feel free to remove any reference you see. Don't remove any drivers unless the hardware has been removed from the PC. If your antivirus or anti-spyware program are expired and out of date, you may as well uninstall them since they are taking tons of resources and newer, free alternatives are available online. Removing some items here will require a reboot.
Step 3 - Clean-up Registry and Temporary Files
This may not be as much of a performance tune-up as it is a generally good practice to cover, especially since it'll free up some hard drive space.
The best tool we've found to clean up temporary files and the registry is CCleaner (aka CrapCleaner). Overall this is one of the best tweaking programs out and can definitely help you easily fix issues with your system. Download and install this program, making sure not to turn on extra features you won't use like the Yahoo Toolbar it tries to install. Run the program and uncheck any specific items you don't want to remove. If you require it, go through the Advanced Options and check any entries that you require to fix issues with your PC (such as Window Size/Location if one is resized awkwardly). Then click Run Cleaner at the bottom right. After several seconds it should complete, giving a detailed report on resources recovered.

In this case, 1.3 GB was recovered!
CCleaner also has some other cool features. Click the Issues button on the left and it'll find problems in the Registry. It might be a good idea to quickly browse the list to determine what kind of problems were found. Backup the registry before running this tool (Start, Run, Regedit [HIT OK], File (at the top), Export [type name and Save]). Most of these can be fixed safely using the Fix Selected Issues button. Additionally the Tools tab can be used to uninstall more programs, delete broken uninstall links, and turn off additional Startup programs much like HiJackThis as mentioned in Step 3.


Step 4 - Removing Programs that Run at Startup
Removing extra programs that run when Windows starts will greatly increase its performance. These programs usually load in the system tray at the bottom right, but sometimes you won't see the programs at all. Note that these programs typically do not need to run at startup to function! From the Start menu, choose All Programs, then right click Startup and choose Explore. Delete any repeat entries or shortcuts you are sure you can do without (we'd remove the stuff relating to Microsoft Office, Real Player, Quicktime, etc.). Very rarely do you need any startup shortcuts in this folder. Repeat the process using Explore All Users if you have multiple user accounts.
Now from CCleaner as mentioned above, navigate to the Tools option to the left, then click Startup. This tool cannot break your PC, but at worst limit its functionality. As long as you are only turning off startup programs here, your PC can recover from damn near anything you turn off. It may be a good idea to backup the registry (mentioned above) if you use this tool. The tool tells you where in the registry to find the keys that it's going to remove and the program path it executes.

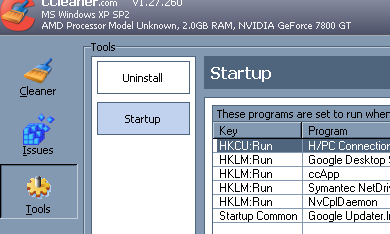
You may find lots of crap lurking here.
We've startup programs in other tweak guides, but basically any 3rd party program can be removed from this list unless it involves an all-in-one printer or the PC is a notebook (in which case you'll want to keep support for the touchpad and power management). We recommend removing "Save", "Weather", "Deals", etc. as these are generally Ad-ware. Turn off anything relating to Real Player (keyword being "Real"), Quicktime (such as qttask), and findfast. There are online lists available detailing all the startup files such as this one. If you're scared to turn something off, check to confirm if it's required. Each program here is DIRECTLY RELATED to the system's performance, particularly its free memory and CPU.
This program allows you to manually edit even more startup items including Toolbars, Browser Help Objects, and some Services. This program all but replaces HiJackThis and msconfig. Make sure to remove references to uninstalled programs or expired antivirus/anti-spyware applications.
More Startups - Services
In Windows, common essential tasks run as "Services" under svchost.exe. These Services include such items as Windows Firewall, Windows Intaller, and various network support features. Most services supplied with Windows XP aren't required. However, some can be disabled to free up some resources. Some argue that disabling Services does not help system performance, but if 3rd party Services are enabled they sure can't help.
The best way to turn off individual Services is to choose Start, Run, Services.msc [then hit OK]. Alternatively go to Start, Control Panel, Administrative Tools, Services. From here, double-click any Service you're positive you want to disable, perhaps Automatic Updates or Adobe LM Service. From the dropdown menu labled Startup Type choose Disabled. Stop the Service currently running using the Stop button. Normal services should be set as Automatic or Manual (with Start greyed out). So what Service should you disable? That's nearly impossible for us to answer. Generally you should be able to determine which Services you need. If you're unsure of a Service, check this article.
If you're having problems fixing File and Print Sharing issues, make sure you check our article for the correct services to use.


Step 5 - Clean your Desktop and Start Menu
This would be a great time to clean-up some other key areas to the PC's response time and zippiness. I'd start by deleting extra icons and downloaded files on the Desktop (visible quickly by hitting the Windows and D keys simultaneously). Delete lots of stuff here! These icons may not seem significant but they're taking some memory. Also, navigating a cluttered desktop is damn near impossible. For now at least create subfolders such as Downloads, Text Documents, and so-on and store the majority of files in these. A clean desktop will probably increase your productivity even if it doesn't help the PC's performance much.
This would also be a good time to clean up your Start menu. Open it up, find shortcuts that you don't use, right click the entries and choose Delete. You can also remove shortcuts to programs that you only run when you open a data file. For example, the shortcut to Quicktime is probably unnecessary, as you'll open this program automatically when clicking Quicktime movies.
Wrap it Up
These steps take about 5-15 minutes to complete once you've learned the process. As a habit we tend to run basic tune-ups on just about every PC we touch and the results are always worthwhile. For additional tuning, start to defragment your hard drive (My Computer, right-click your C: hard drive, choose Properties, Tools, Defragment Now) before you go to bed one night as it may take a few hours to complete. Keep an eye on system resources (CTRL-ALT-DELETE) as you install new programs to determine if more tuning is necessary. Don't forget to update major system drivers (especially video, sound, and chipset) and run Windows Update regularly for new patches and fixes.
Thanks for reading.

Digg this article.

The 15 minute Windows XP tune-up

The 15 minute Windows XP tune-up
Got a slow movin' computer? Try the Windows XP 15 minute tune-up.
Chances are, it's not a hardware problem that's making your system run so slowly, but a backup of old, clogged data that's draining your memory. Computing siteTweak3D.net offers a few suggestions that can get that sluggish machine running at max speed in fifteen minutes or less, including:
  • Step 1: Stripping off the Rust
  • Step 2: Remove Extra Programs
  • Step 3:Clean-up Registry and Temporary Files
  • Step 4:Removing Programs that Run at Startup
  • Step 5:Clean your Desktop and Start Menu
Having just completed this checklist myself, I can tell you that my computer's productivity increased by a considerable margin.

Step-By-Step: Tune Up Your Windows XP Machine (for Free)

Step-By-Step: Tune Up Your Windows XP Machine (for Free)

Windows reminds me all too often of those finicky foreign sports cars of decades past. If you don't spend time tweaking, maintaining, and tuning it, it tends to run a little rough. A lot goes on under the hood to keep your XP-based PC running smoothly; but as you add, update, and delete software and data files, things can get sluggish. XP's built-in tweaking tools can boost your PC's performance.
Windows XP has fewer built-in tools than earlier versions of Windows, though the tools available are more full-featured. Other more-sophisticated and automatic tune-up tools can be found in various suites and stand-alone utilities, as discussed in "The Trouble-Free PC." But if you're frugal, their cost (up to $90) may give you pause. XP's built-in tools, along with a few free add-ons, should be sufficient for most users and most situations.
If you're using an earlier version of Windows, consult "Get a Free Tune-Up for Your Windows PC." And if you're up for a more extensive overhaul, check out "Optimize Your PC for Faster Start-Up Times" first.
1. Back up your PC. It's essential to perform regular backups of your PC, particularly if you'll be using utilities and tools that make software changes. Unfortunately, Windows XP Home Edition doesn't come with a backup utility. See Utilities To Back Up Your Data for downloads that will do the job. The built-in backup utility in Windows XP Pro is more robust than earlier versions, but it won't back up to a CD-R. It does work with CD-RWs, hard drives, and removable storage.
Log in to XP Pro with Administrator privileges, select Start, All Programs, Accessories, System Tools, Backup. Step through the various dialog boxes and follow all directions. In the 'What to Back Up' dialog box, choose the All information on this computer option if you haven't done a backup before. This will create a floppy that you can use to boot your PC and to restore the backup after a crash.
2. Check hard drives for errors. It's wise to do a thorough check on the status of your hard drives occasionally. Go to Start, My Computer, right-click the icon for your C: drive, and choose Properties. Then choose the Tools tab and click the Check Now button. Repeat this step for your other hard drives.
Applications and files must be closed in order for error checking to fix the problems it finds, so XP will often report that the disk check will run the next time you restart your system if you've checked 'Automatically fix file system errors' on the next screen. Note: Finding and recovering bad sectors can take hours if you have a large drive.
3. Defragment hard drives. The more you use your PC, the more some files become broken into disparate parts scattered around your hard drive. Defragmenting rearranges each file's pieces into a single continuous block for faster access. You'll need to be logged in as the Administrator to run XP's Disk Defragmenter. First select Start, All Programs, Accessories, System Tools, Disk Defragmenter. Highlight the drive that you want to check, and press the Analyze button. XP will tell you whether the drive needs to be defragmented. If XP does recommend defragging, click the Defragment button.
4. Sack any spyware. A free program like Spybot Search & Destroy or Ad-aware can get rid of any freeloading spyware that makes its way onto your system.
5. Clean out unneeded files. Go to Start, All Programs, Accessories, System Tools, Disk Cleanup, and select the drive you want to clean. XP will analyze your files and show a list of which ones can be removed. Check the boxes next to the categories you want to discard.
The More Options tab offers you several more cleanup choices. The System Restore cleanup option, in particular, can clear lots of disk space by erasing old restore points. 6. Back up again. Once you've finished tweaking your system and you're sure that everything is running well, it's a good idea to back up everything once again. That way, you'll always have a clean, fully optimized starting point that you can return to in case a disaster befalls your system.

How to Tune up Your Windows XP PC

Edited by Jack Herrick, Syndi B, Cem, Ben Rubenstein and 28 others
0
Here are some expert step-by-step tips for tuning up, tweaking & optimizing your personal computer running the Windows XP operating system.

Edit Steps

  1. 1
    Run "Windows Update" regularly, or use the automatic "Critical Updates Notification".

  2. 2
    Install anti-spyware software (Ad-aware, Spybot S&D & Spyware Doctor are all good ones) and keep it updated. Spyware Blaster runs in the background and stops spyware installing itself.There are many rogue anti spyware applications out there make sure you select one with care. Read more about such scareware applications:Wikipedia Scareware

  3. 3
    Run the anti-spyware program regularly to keep your PC clean.

  4. 4
    Install & regularly update your anti-virus software.

  5. 5
    Run the anti-virus program on a regular basis.

  6. 6
    One option is to enable "Microsoft Firewall". However MS Firewall does not control outgoing connections (ie. a virus/worm trying to 'phone home'). Download and install ZoneAlarm - a free version is available.

  7. 7
    Make sure there's nothing in the Startup list. (Start Menu> All Programs> startup) Unless there are programs in the list that you need to run when the computer starts up, it should be empty.

  8. 8
    Uninstall unnecessary or rarely-used programs in "Add/Remove Programs".

  9. 9
    Clean the Desktop icons you don't use. Put them in a folder (preferably not on the desktop) if you are nervous about deleting them.

  10. 10
    Clear the Recent Documents & Programs list, on Taskbar & Start Menu properties.

  11. 11
    Internet Explorer users:
    • In "Temporary Internet Files", delete cookies, and delete files.

    • In the "Advanced" tab, uncheck all "Install On Demand" items and disable Javascript and VB Script listed under "Microsoft VM".

  12. 12
    In your "Windows" folder, manually delete files in the "Temp" folder.

  13. 13
    Delete unused system tray programs.

  14. 14
    Remove startup programs with the MSConfig application (Start>Run> "msconfig", OK).

  15. 15
    Run Windows Disk Cleanup. Do this at least twice a month. Make sure 'Recycle bin' is checked to periodically empty it.

  16. 16
    Run MS Disk Defragmenter. Do this at least once a month (Start Menu> All Programs> Accessories> System Tools).

  17. 17
    Update your drivers for CPU, memory, video card and sound card, etc. Download the driver updates from the manufacturer's web site.


Edit Video


Edit Tips

  • Try to develop the discipline of editing your video files soon after taking them, then immediately burn them to DVD backup and remove them from your PC to save space on the hard drive.
  • If you use MS Outlook email service, delete your biggest and oldest emails.
  • When you perform Disk Cleanup in the "More Options" tab, remove old system restore points; this can clear about 2GB of disk space!
  • Your data will be easier to manage if it's organized and in one place. Your "My Documents" folder can be very helpful for this.
  • To change the mouse speed in Windows XP: (Start>Control Panel>Mouse>Pointer Options tab). Move slider settings to two , three points faster - this can increase the appearance of the mouse's pointer speed on your screen. Make sure 'Enhance pointer precision' is disabled or mouse acceleration will be present.
  • When installing any Instant Messengers, be certain “Run on startup” isn’t selected by default. It's not necessary for the Messengers to open on every startup. This will help the start-up load faster.
  • If you want faster internet performance, consider an alternative browser such as Opera, Avant, Google Chrome, or Mozilla Firefox.

Edit Warnings

  • Just in case, make a backup of all of your documents you never want to lose, before you start cleaning.
  • In the "Windows" folder use caution your system files are on there and only access the temp do this at your own risk.
  • Clean at your own risk!
  • For disk and registry cleanup, learn to clean your registry (to be safe, use Registry Mechanic, CCleaner and Regcleaner ).
  • Automatic all in one tools to do all the above jobs: